.JPG)
This build started with relocating my scrapyard to a newly-opened area formerly along Montreal Street on my layout. The first phase involved making rusted metal fences for the scrapyard perimeter. But that was just the beginning! Nearly finished, I photographed the new scrapyard outside, where it was mostly built - in the fresh air of our backyard sunroom (top photo). How did we get here? Read on.
.JPG)
I decided to map out the available space for the scrap-yard using 11x17 sheets of paper. It's about 24 inches long by 7 to 9 inches wide. I marked the perimeter and the scrapyard CP spur in Sharpie (above). I then used some brown cardstock as a base for the scrapyard, cut to the Sharpie outline (below). I used Dollarama modelling clay to mold bases for the perimeter fencing, which I simply stuck in. The gap at the rear, between the buildings is for accessibility to two turnouts on the layout:
.JPG)

Before finally installing the fences, I painted the clay to represent foliage (above) then reinstalled the fences and decided on the placement of the two structures (below). Both are train show finds, with the Atlas switchman's shanty stil bearing its "50 cents FS" price sticker.

.JPG)
I worked on the build in morning, afternoon, and under lamplight, on and off over four days. This morning light highlighted progress, with both structures painted grey and black, and a Chooch Enterprises scrapyard centrepiece in place (above). I mapped the roads and spur with paint-daubs, looking something like the Yellow Brick Road!


I started placing scrap pieces and vehicles along the fences, after adding some inside-the-fence foliage. This was going to be rustic, slightly neglected, circa 1970 scrapyard, not the high-efficiency ones of today! Notice the impressions of the spur (above). I had planned to unscrew the spur track and replace it on top of the installed scrapyard, but then decided to add it to the build so I could weather it better. Adding foliage around the edges. Those 'steel girders' are scrap pieces cut off during fence construction then painted.


Gluing down some gravel for the roads (above). I still need a scrapyard crane and the entire scrapyard should be accessible for the crane and trucks, not to mention gondolas for scrap loading! Some large-scale rail pieces to which I gave a good home (below). Such pieces, as well as the spur track, are installed using white glue or Testors styrene cement onto the brown cardstock.


My workplace! Captured in action by my good wife, with spur track glued down, paints in use, cold beverage and ginger snaps above. Cool afternoon winds blow through the sunroom screen (above). Outdoor photographs with the build perched on the sunroom landing's railing, showing a fence-level view then overhead view of the whole scrapyard:
.JPG)
.JPG)
A 1968 Whig (Queen's University Archives) photo shows flooding at the Cohen scrapyard after a fire. Note the CP boxcar at centre (below). Though I've variously referred to my current scrapyard as Cohen or KIMCO, I'll probably stick with Cohen now.
.JPG)
The scrapyard's battery recycling operation is centred on the larger structure and some trailer bodies at right. At left, a casualty of a WWII flying accident and some vehicles rest along the fence at left:

I did some additional scenicking including prototype rust that ARK member Bob Farquhar included with freight cars I purchased from him at our 2019 train show. He mentioned that he and his wife salvaged the rust from along various Ottawa walking trails. It's really rusty! It was hard to push away from the table, but I finally decided enough fussing and no more details were needed. It was installation time!  If I'd measured the space accurately, I could simply slide the cardstock off the build-board and adjust it into place. Fortunately, I had only a couple of small adjustments to make. Clearance on CN (foreground) and CP (background) lines looked good, and the scrapyard spur got its first test car - a CP Rail gondola for loading.
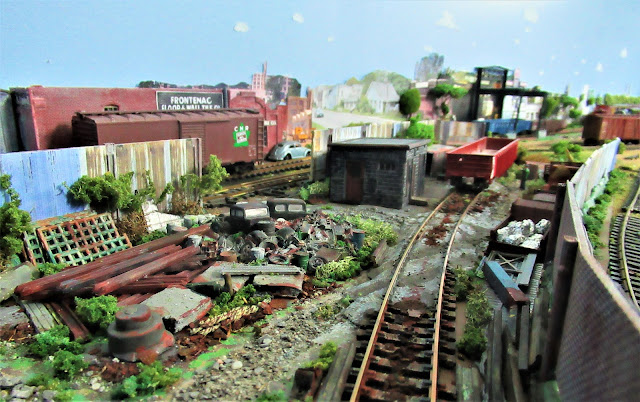 Along-the-spur views - from the turnout end of the spur (above) with jointly-served industries Frontenac Floor & Wall Tile and Presland Iron & Steel in background. The end of the spur (below) with Gus Marker and Frontenac in the background. All that remains is to add a tracked crane to move that scrap around, figures and final scenery and figures.
 I deconstructed a Life-Like rail crane, gluing the cab on tracks from a Majorette excavator, painting and adding Browning lettering to the back of the cab. Two metal figures look workmanlike enough to find their way into the scrapyard scene!


Well; I see a mid 1960's White tractor in front of the CP boxcar. I was going to suggest an inexpensive flat deck trailer parked somewhere on the property. I believe in your era there weren't many "dumpsters" but scrap metal would always make for a pay load for a local trucker.
ReplyDeleteHi Robert,
ReplyDeleteI need to do some more dumpster research. (Or should I say, a deep dive into dumpsters? Dumpster-diving? Anyway, one earnest modeller suggested that KIMCO was Kingston Iron & Metal until a certain year. So, I have cardstock dumpsters labelled for both. Not sure that Cohen was into the dumpster biz. I still have the above-mentioned dumpsters spotted at industries and lots around the layout! I have a Whig photo showing a KIM&Co one in use in 1963 - riding a Chevy truck.
Thanks for your coment,
Eric
Hi Eric,
ReplyDeleteHow do you make your fences? They look great
Thanks,
Dave
Hi Dave,
ReplyDeleteThey're saved from Google. I just search rusted, corrugated metal then save the images, paste them in Word, resize and move them around so they alternate. Then I print on regular paper, cut out and glue on styrene as a framework. They're only made to be seen from one side, so I don't spend as much time on the back side. Watch for an upcoming Trackside Treasure post on this and my other summer modelling projects - outdoors!
Thanks for your comment,
Eric
Thanks Eric,
ReplyDeleteI will try this.. I need a fence for my scrapyard.
Cheers,
Dave